Tips to quickly fix iPhone battery drain. The battery life of modern smartphones is now only a few hours before they need to be recharged because of their increased intelligence. These tips may be able to help you if you’re one of the many users whose iPhone battery drains too quickly.
Advertisement
Why Does My iPhone Battery Drain So Fast?
As your iPhone becomes older, the battery’s performance degrades. This is very typical, and if your phone is older, it’s definitely time to get it a new power source.
On the other hand, there are a few reasons your phone can use more battery than usual even when it is brand new.
- Apps—Although the majority of apps in the App Store are reputable and trustworthy, some incompatible or buggy apps may consume your iPhone’s hardware resources unnecessarily, causing the battery to discharge more quickly than usual.
- Updates: If you recently updated your iOS, the new and/or updated features may place a greater demand on the battery, leading to a higher rate of battery discharge. When your iPhone model is the last or second last on the list to get the most recent iOS update, this typically occurs. If you’ve upgraded to an unstable, bug-filled beta version of iOS, your phone’s battery may also discharge more quickly.
- Settings – Excessive battery usage may also be caused by settings that are incorrectly setup. Misconfigured auto-brightness, unneeded or accidental Personal Hotspot activation, or even incorrect display setting configuration are a few examples.
Best Tips to Help You Solve iPhone Battery Drain
The following advice can help you resolve the issue if your iPhone battery continues to deplete quickly after ruling out all the scenarios covered above.
Advertisement
Bonus Tip: Restart your iPhone
This is not a suggestion, but rather a quick and easy way to resolve numerous frequent problems that your iPhone (or any other iDevice) may have without warning or explanation. While the usual approach of long pressing the Sleep/Wake button and following the on-screen instructions is required to reboot your iPhone, the procedure is slightly different with iPhone 8 and higher models. This new method is described below, just in case:
- Press and release the Volume Up.
- Quickly press and release the Volume Down.
- Long press the Sleep/Wake.
- Slide the message bar that says slide to power off.
- Once your iPhone is turned off completely, you can press (or long press as per your phone model) the Sleep/Wake button again to power it back on.
Tip 1: Check Your iPhone’s Battery Usage and Health
You can determine whether your iPhone’s battery needs to be replaced or whether the problem is simply with the settings being incorrectly configured by looking at the battery’s health. For a battery health check:
- Go to Settings from the Home.
- Tap Battery.
- Tap Battery Health on the Battery.
- Check the Maximum Capacity status of the battery.

Advertisement
Note: Any percentage with the statement “Your battery is currently providing normal peak performance.” under the Peak Performance Capability section is OK as long as it is between 75 and 80 percent. If the values are different, the battery might need to be replaced.
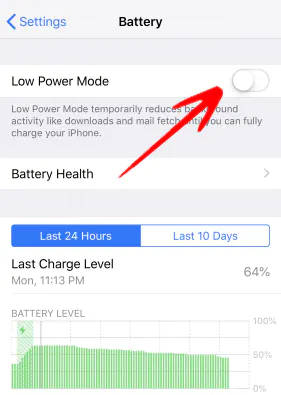
Tip 2: Turn On Low Power Mode
The Low Power Mode automatically modifies your iPhone’s settings so that they use less power than usual, extending the battery’s useful life. In order to activate Low Power Mode on your iPhone:
- Go to the Battery window as explained in Tip 1.
- Turn on the Low Power Mode toggle switch.
Tip 3: Disable/Turn Off Some Resource Intensive Features On Your iPhone
Recent versions of iOS are packed with clever features that make it unnecessary to use any other device to handle daily tasks. However, leaving them enabled will quickly deplete your battery because many of these programs require a lot of power to run effectively.
Advertisement
Nevertheless, it is a good idea to disable any settings you use infrequently or never. You can turn off the unnecessary features on your iPhone by following the guidelines provided below:
3.0 Turn Off Bluetooth
- Go to the Settings window from the Home.
- Tap Bluetooth.
- Turn off the Bluetooth toggle switch from the Bluetooth.

3.1 Disable Location Services
- Go to Settings > Privacy> Location Services.
- Tap the Location Services toggle switch.
- Tap Turn Off on the confirmation box that pops up at the bottom of the screen.

3.2 Disable Background App Refresh
- Tap General from the Settings
- Tap Background App Refresh.
- Tap Background App Refresh on the next window.
- Tap Off to disable the feature on your iPhone.

Advertisement
3.3 Turn Off App Suggestions
- Tap Siri & Search from the Settings.
- Scroll down to the SIRI SUGGESTIONS.
- Turn off the Suggestions in Search, Suggestions in Look Up, and Suggestions on Lock Screen toggle switches.

3.4 Disable App Messages Pushes
- Tap Notifications from the Settings
- Tap Show Previews.
- Tap Never on the next window.

Advertisement
3.5 Disable Wi-Fi When You Don’t Need It
- Tap Wi-Fi from the Settings
- Turn off the Wi-Fi toggle switch.

3.6 Disable Motion & Animations
- Go to Settings> General.
- Tap Accessibility.
- Tap Reduce Motion.
- Turn on the Reduce Motion toggle switch.
Advertisement

3.7 Disable Personal Hotspot
- Go to Settings> Personal Hotspot.
- Turn off the Personal Hotspot toggle switch.

3.8 Disable Dynamic Backgrounds
- Go to Settings> Wallpaper.
- Tap the image currently set as your wallpaper.
- Ensure that the Still tab is selected at the bottom of the Wallpaper Preview
- Tap Set to disable Dynamic Background.
Advertisement

Note: Remember to turn off Dynamic Background on the Lock Screen as well. You can do this by tapping the picture next to the wallpaper in the Wallpaper window and then following the guidelines above.
3.9 Turn Off Data Push
- Go to Settings> Passwords & Accounts.
- Tap Fetch New Data.
- Turn off the Push toggle switch to disable data push on your iPhone.

3.10 Turn Off AirDrop
- Go to Settings> General.
- Tap AirDrop.
- Tap Receiving Off on the next window when it comes up.

Advertisement
3.11 Shut Down Apps Less Often
Although you can force-quit the apps by double-pressing the Home button on an iPhone 8 or earlier (or swiping up the Gesture Bar to the center and holding down the screen for a brief period on an iPhone X or higher) to enter the App Switcher mode, this method causes the apps to use more battery when they are relaunching. Avoid forcing the apps to close if your iPhone’s battery is running down quickly if you want to conserve some power.
Tip 4: Remove Apps that Cause iPhone Battery Drain
To save battery life, delete any power-hungry apps from your iPhone that you don’t find helpful. Therefore, the first step in this strategy is to identify the battery-draining app(s) before deleting it(s) entirely from your iPhone. To accomplish this, you can take the following actions:
Advertisement
- Get to the Battery window as explained in Tip 1.
- Scroll down to the BATTERY USAGE BY APP
- Notice which app is consuming more amount of battery and see if it is useful.
- Get back to the Home.
- Long-tap any app until all the icons start wiggling.
- Tap the Delete(X) icon at the top-right corner of the battery consuming app icon.
- Tap Deleteon the confirmation box that pops up next to remove the app from your iPhone.
- Repeat steps 6 and 7 for all the apps you want to remove.

Tip 5: Reset All Settings
Resetting all your iPhone’s settings is yet another smart approach that lets you take all its configurations back to default and start over. The steps are straightforward and are described below:
Advertisement
- Go to Settings> General > Reset.
- Tap Reset All Settings.
- Tap Reset All Settings on the confirmation box that pops up at the bottom.

Tip 6: Restore Your iPhone
Your iOS may become screwed up with time and may require some overhauling if there have been several installs, uninstalls, and regular changes to the settings. To save battery life, you can reset your iPhone to its factory default settings by following the procedures listed below:
Advertisement
6.0 Back Up Your iPhone
- Connect your iPhone to your Windows or Mac computer.
- Launch iTunes if it doesn’t start automatically.
- Click the phone icon from the top of the interface.

- From the Backups section of the Summary window, select the This Computer radio button.
- Check the Encrypt local backup.
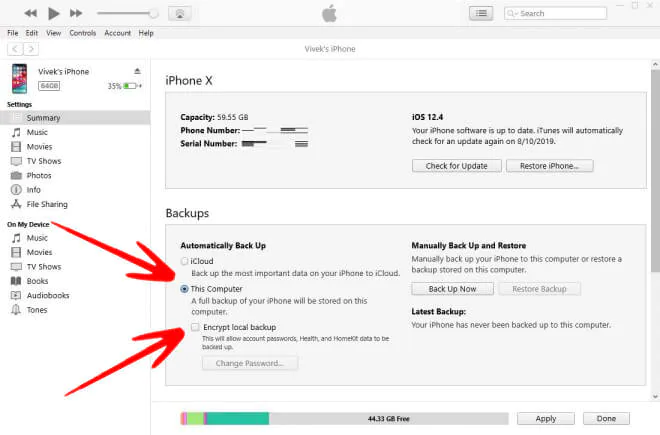
- Type and retype a strong password in the corresponding fields.
- Click Set Password and wait while your iPhone is backed up to your local computer.
Advertisement
6.1 Disable Find My iPhone
- Go to Settings.
- Tap Apple ID, iCloud, iTunes & App Store from the top.
- Tap iCloud.
- Tap Find My iPhone from the APPS USING ICLOUD

- Tap the Find My iPhone toggle switch.
- Enter your Apple ID password when prompted.
- Tap Turn Off.

Advertisement
6.2 Restore Your iPhone
- Get back to the iTunes’ Summary.
- Click Restore iPhone from the upper section in the right window.

- Wait while iTunes restores your iPhone.
6.3 Restore from Backup (Optional)
This step is optional, so only do it if you’re certain that the odd power drain wasn’t caused by your iPhone’s settings or data.
- Once the iOS is restored, get back to the iTunes’ Summary
- Click Restore Backup from the Backups.
Advertisement

- Ensure that the latest backup is selected in the Restore From Backup box.
- Click Continue to restore your iPhone from the backup.

Read
How to manually remove virus from an Android Phone
Tip 7: Update/Downgrade iOS On Your iPhone
Advertisement
The battery problem might be fixed if you update your iOS to the most recent version if it is out of date. Likewise, upgrading iOS to an earlier, more reliable build can work if you find that the latest version is the problem. The two procedures are described below so you can decide one best matches your needs:
Update iOS
- Connect your iPhone to a Wi-Fi network.
- Go to Settings> General > Software Update.
- Tap Download and Install to update the iOS on your iPhone.
- Note: If no update is available, ‘Your software is up to date.’ message is displayed on the Software Update.

Advertisement
Downgrade iOS
- Go to https://ipsw.me/, select your iPhone, and download the .ipsw file for the iOS version that worked efficiently.
- Connect your iPhone to your Windows or Mac computer.
- Back up your iPhone to iCloud or your local computer as explained in Tip 6.
- While still on the iTunes’ Summary window, press and hold down the Shift key and click Restore Now.

- Use the iTunes box to locate and select the .ipsw file you downloaded in Step 1.
- Click Open and wait while iTunes installs the stable version iOS on your iPhone.
Advertisement

- Once done, follow the on-screen instructions to set up your iPhone.
- Reconnect your iPhone to your computer and get back to the Summary window on iTunes.
- Restore your iPhone from backup as explained in Tip 6.
Tip 8: Replace the Old Battery with a New One
If none of the aforementioned solutions work, you might need to get a new iPhone battery. Even if the replacement procedure is straightforward, it’s best to leave it to the experts.
Advertisement
Tip 9: Ask for the Battery Replacement Program
You should get in touch with Apple’s Customer Support Team and request the necessary paperwork if your iPhone is still covered by warranty or if its model qualifies for the company’s battery replacement program. To see if your iPhone is still covered by its warranty and whether you qualify for the Battery Replacement Program, click this page.